Most installations are handled by in-house store setup crews, warehouse staff, or facility teams. Outside specialists aren't usually needed, but two people always are — especially for units taller than single-tier height.
This guide walks through the complete assembly process, from pre-installation prep through final validation, so your unit performs safely and exactly as designed.
Key Takeaways
- Inspect all components before assembly — bent uprights or misshapen connector holes can't be worked around
- Build side frames horizontally on the floor before standing them up
- Cross-bracing is mandatory; skipping it is the leading cause of post-assembly racking
- Load ratings assume evenly distributed loads — concentrated point loads reduce effective capacity
- Wall anchoring is required in most commercial, retail, and high-traffic environments
Before You Begin: Prerequisites and Tools Needed
Site Readiness
Before any component leaves the packaging, confirm three things:
- The floor is flat and level — even minor gradients cause frame stress and visible wobble once loaded
- The space accommodates the full unit footprint plus a working buffer on at least two sides
- All components are present and undamaged — cross-reference every item against the manufacturer's packing list
Missing or deformed structural components must be replaced before assembly starts. Do not substitute hardware or attempt to reshape warped uprights.
Three non-negotiables before you begin:
- Do not proceed with missing or visibly deformed uprights or cross-bracing
- Do not assemble against the wall until the frame is complete and stable
- Do not attempt solo assembly on any multi-tier unit
Tools and Materials Checklist
Essential:
- Rubber mallet
- Adjustable wrench or socket set (bolt-style units)
- Measuring tape
- Spirit level
- Protective gloves
Recommended:
- Power drill with appropriate bit (if wall anchoring is required)
- Safety goggles
Most heavy duty steel shelving uses boltless or rivet-style connections that require no power tools for the main frame. Bolt-and-nut systems, found more often in heavier commercial applications, require a wrench. If your unit uses bolted connections, check the manufacturer's documentation for torque specifications before tightening anything fully.
Step-by-Step: How to Assemble Heavy Duty Steel Shelving
Assembly follows a defined sequence. Skipping bracing or loading shelves before leveling are the most common causes of structural failure , and the most avoidable ones.
Step 1: Unpack, Sort, and Inspect All Components
Lay everything out on a clean, flat surface and sort by type:
- Uprights / vertical posts
- Horizontal beams (front/back and side/depth)
- Shelf boards or wire decking
- Cross-braces
- Clips, rivets, or bolts
- Rubber feet / floor levelers
- Wall anchor hardware (if included)
Cross-reference against the packing list. Inspect uprights for bends and connector holes for deformation — shipping damage to these components is not fixable in the field.
Step 2: Attach Rubber Feet and Prepare the Uprights
Attach rubber feet or leveling pads to the base of each upright before raising anything. These protect the floor surface and allow micro-adjustments for slight floor irregularities later.
Lay two uprights flat and parallel on the floor. This horizontal build approach gives you far better control over alignment and connection seating than working with the frame already upright.
Step 3: Connect the Side Beams to Build the Upright Frames
Insert the side (depth) beams into the connector holes at your target shelf heights. For rivet-style units, drive connectors firmly into place with a rubber mallet until fully seated. For bolt-style systems, hand-tighten all fasteners at this stage — do not fully torque until the frame is plumb and squared.
Build both side frames identically before moving on, since asymmetric frames are nearly impossible to correct once the unit is standing.
Step 4: Stand the Frames and Attach Front and Back Beams
This step requires two people. Stand both side frames upright and hold them at the correct width for your front and rear beams. Insert front and rear horizontal beams at each level, starting from the bottom and working upward.
For wider units, check your manufacturer's documentation for whether center supports are required at each level. Lyon's load capacity documentation notes that rated capacities assume beams joined by the correct number of front-to-back supports; omitting them directly reduces what the shelf can safely carry.
Use the rubber mallet to lock all connections once beams are positioned.
Step 5: Install Cross-Bracing and Shelf Boards
Install diagonal cross-bracing panels at the rear of the unit (and sides where specified). These are the primary components that resist side-to-side frame collapse. Republic Storage confirms that back sway braces stabilize open steel shelving from lateral sway. Without them, even a properly built frame can rack under load.
Once bracing is secured, lay shelf boards or wire decking onto the beams. Boards should sit flush without rocking. If any board rocks, a beam is not fully seated. Address it before loading — not after.
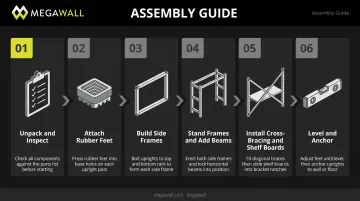
Step 6: Level the Unit and Anchor If Required
Use a spirit level to check alignment in both directions: side-to-side and front-to-back. Adjust rubber feet incrementally until the unit reads plumb on all columns.
For retail, commercial, or any high-traffic installation, anchor the unit to the wall using the provided hardware. The CPSC's 2021 recall of Lidl Powerfix steel shelving was specifically tied to tip-over and entrapment hazards, a risk that anchoring directly mitigates.
Most commercial safety codes — and some manufacturers, including Hallowell per their assembly documentation — require floor or wall anchoring before the unit is put into service.
Post-Assembly Checks and Validation
Before loading any weight, complete these checks:
Visual inspection:
- All beams fully seated — no gap between connector and upright column face
- Cross-bracing flush and secured at both ends
- All rubber feet in firm contact with the floor
- Bolt fasteners tightened (per Lyon's assembly instructions: "Make sure all fasteners are securely tightened before shelving is to be used")
Functional check: Apply gentle lateral and forward pressure to the assembled unit. It should not rack, wobble, or creak. If instability appears, trace it to the lowest unsecured connection before adding any load.
Loading a structurally unsound unit compounds stress and makes disassembly far more difficult. Problems that take minutes to catch now can require a full teardown to fix later.
Common Assembly Problems and How to Fix Them
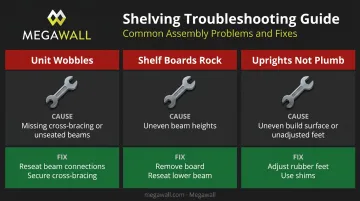
Problem 1: The Unit Wobbles or Racks Under Light Pressure
Cause: Cross-bracing not installed or not fully engaged; or one or more beams not fully driven into connector holes.
Fix: Unload and re-inspect all beam connections. Reseat any loose connections with a rubber mallet. Confirm rear cross-bracing panels are installed with both attachment points secured. If the floor is uneven, adjust rubber feet until all four corners make firm, level contact.
Problem 2: Shelf Boards Rock or Sit Unevenly
Cause: Beams at that level are not set to the same height on both sides, or a rivet/connector on one side is not fully locked.
Fix: Remove the shelf board and inspect beam heights on both sides. Reseat the lower beam with a mallet until flush. For boltless systems, the rivet should sit flush with the upright column face — any protrusion means an incomplete connection.
Problem 3: Uprights Are Not Plumb After Assembly
Cause: Side frames were built on an uneven surface, or rubber feet haven't been adjusted to compensate for floor irregularities.
Fix:
- Check both sides of each upright with a spirit level
- Adjust rubber feet incrementally until plumb
- Use shim material for significant floor gradients — the foot adjuster is designed for minor corrections only
- Re-check plumb after loading, since weight distribution can shift the unit slightly
Pro Tips for Assembling Heavy Duty Steel Shelving Effectively
Build frames on the floor. Assemble side frames horizontally before raising them. You get better control over alignment, connections seat more completely, and you're not fighting gravity. Only stand the frames when you're ready to connect them with the front and rear beams.
Plan shelf heights before assembly. Decide your spacing based on what you're storing — heavier items lower, lighter items higher, and measure the tallest item at each level before committing. Rearranging beams after loading is more work and higher risk than getting it right upfront.
Document the final configuration. Note shelf heights, load ratings per level, and anchor points once assembly is complete. This supports safety audits, speeds up future reconfiguration, and gives you a reference when components need replacing.
Coordinate with your wall display strategy. In retail environments where freestanding shelving works alongside wall-mounted display systems, plan the shelving footprint before assembly starts. Steel slatwall panels — Megawall's Steel Slatwall System, for instance, holds over 50 lbs per linear foot — can run alongside freestanding shelving to extend vertical display capacity without consuming additional floor space. Sorting out that spatial relationship upfront avoids repositioning shelving units after they're loaded.

Frequently Asked Questions
Can one person assemble heavy duty steel shelving alone?
Smaller single-tier units may be manageable solo, but any unit over shoulder height or with multiple levels requires two people — one to hold frames in position, one to seat connections. Solo assembly of taller units creates real tip risk and makes accurate alignment difficult.
Does heavy duty steel shelving need to be anchored to the wall?
Wall anchoring is strongly recommended for all commercial, retail, and high-traffic installations, and is required by most workplace safety codes. In seismic zones or near rated load capacity, anchoring is non-negotiable — and many manufacturers require it in their assembly instructions regardless of location.
How much weight can heavy duty steel shelving hold?
Capacity varies by model and configuration. Manufacturer specs range widely — for example, Edsal's MuscleRack is rated at 1,000 lbs per shelf, while Uline's H-4859 is rated up to 4,000 lbs per shelf. Always consult your specific unit's rated capacity, and note that all published capacities assume evenly distributed loads, not concentrated point loads.
How long does it take to assemble heavy duty steel shelving?
Most standard units take 30–60 minutes with two people. Larger multi-bay or high-capacity units take longer, particularly when wall anchoring is involved.
What is the difference between boltless and bolted heavy duty steel shelving?
Boltless (rivet-style) shelving uses interlocking connectors driven with a mallet, making it fast to assemble and easy to reconfigure. Bolted systems use nuts and bolts for a fixed connection suited to heavier industrial applications where stability under very high loads is critical.
How do I stop my steel shelving from wobbling after assembly?
The three main causes are unset beam connections, missing or incorrectly installed cross-bracing, and uneven floor contact. Address them in that order. See the Common Assembly Problems section above for specific fixes for each.